A wet ceiling is more than just an eyesore; it’s a sign of potential water damage that could compromise your home’s structural integrity. If you’ve experienced a leak or water intrusion, you might be asking: how long does it take to properly dry a wet ceiling? Understanding the drying process is crucial for preventing mold, mildew, and further structural damage. In this article, we’ll explore the factors affecting drying times, the techniques used, and the importance of professional ceiling drying and wet wall drying services.
What Factors Influence Ceiling Drying Time?
Ceiling drying isn’t a one-size-fits-all process. Several factors can affect how quickly your ceiling returns to a safe, dry state:
-
Extent of Water Damage: Minor leaks may only require a few hours to a couple of days to dry, while significant flooding can extend the drying process to several days or even weeks.
-
Material of the Ceiling: Different ceiling materials absorb water differently. For example, plaster and drywall are highly absorbent, which can increase drying time, whereas suspended or tiled ceilings often dry faster.
-
Humidity and Ventilation: High humidity slows down drying, while proper airflow speeds up evaporation. Using fans and dehumidifiers can significantly reduce ceiling drying time.
-
Temperature: Warmer environments generally accelerate the drying process. Cold conditions slow water evaporation and can prolong the period of wetness, increasing the risk of mold growth.
-
Water Source: Clean water from a burst pipe typically dries faster than water contaminated by sewage or external flooding. Contaminated water may require specialized treatment and wet wall drying techniques.
Understanding these factors is crucial for planning an effective drying strategy and avoiding additional damage.
How Do Professionals Approach Ceiling Drying?
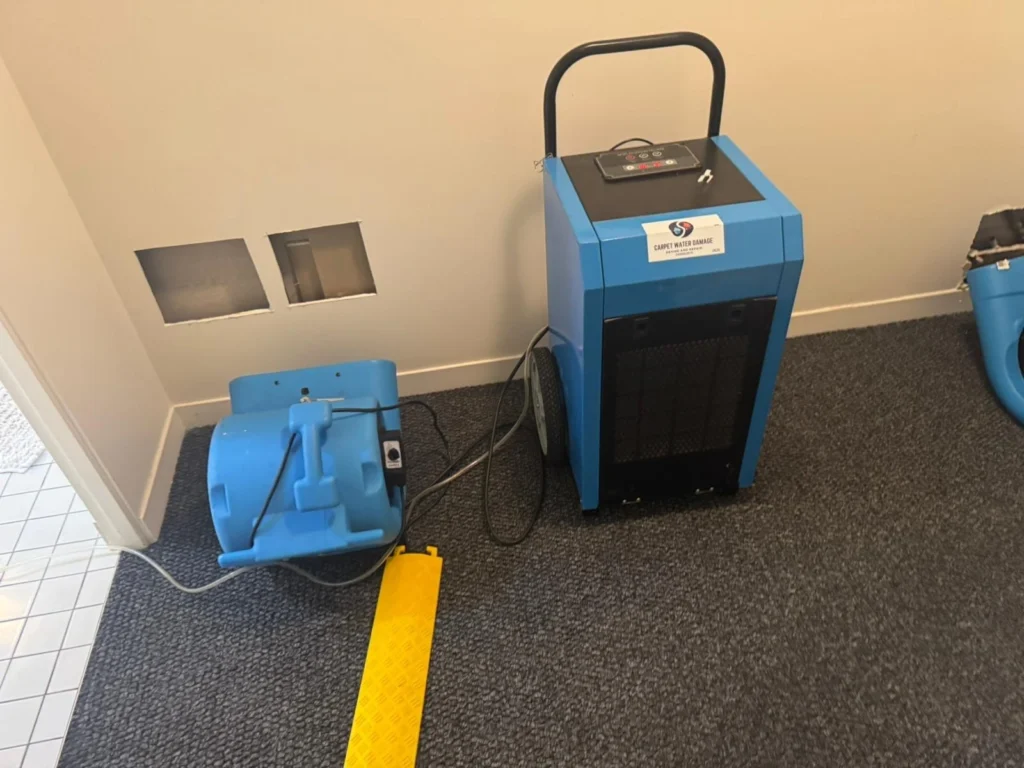
Professional ceiling drying services, like those offered by Structural Drying Australia, use a systematic approach to ensure complete water removal and structural safety. The process typically involves:
-
Assessment of Damage: Experts evaluate the extent of water intrusion, checking for structural weaknesses and signs of mold. This includes inspecting ceilings, walls, and insulation.
-
Water Extraction: Any standing water is removed immediately using pumps or wet vacuums. Removing water quickly is critical to prevent further damage.
-
Wet Wall Drying and Ceiling Drying Techniques: Specialized equipment, including air movers, industrial fans, and dehumidifiers, is used to dry walls and ceilings efficiently. Wet wall drying ensures that moisture trapped behind the walls does not compromise structural integrity or foster mold growth.
-
Moisture Monitoring: Moisture meters and infrared cameras are often used to monitor drying progress. This ensures that both visible and hidden moisture is completely removed.
-
Mold Prevention: Professional drying includes measures to prevent mold growth, such as applying antimicrobial treatments and maintaining optimal drying conditions.
By relying on professionals, homeowners can ensure a faster and safer drying process, minimizing long-term risks.
How Long Does It Take to Dry a Wet Ceiling?
While there’s no universal timeline, here’s a general guideline for how long ceiling drying may take under different conditions:
-
Minor Water Exposure: If only a small area of the ceiling is wet due to a minor leak, drying might take 24–48 hours with proper airflow and dehumidification.
-
Moderate Water Damage: A ceiling exposed to more extensive leaks or minor flooding may require 3–5 days to dry completely. Multiple layers of drywall or plaster will extend this timeline.
-
Severe Water Damage: Significant water intrusion, such as flooding, may require 1–2 weeks or more for complete drying. In such cases, wet wall drying is also necessary to remove hidden moisture.
-
Hidden Moisture: Even when the ceiling looks dry, water trapped in insulation or behind walls can prolong the drying process. Monitoring and continued use of dehumidifiers are essential.
Patience is key during the ceiling drying process. Rushing or cutting corners can lead to structural damage and mold problems down the line.
Can DIY Ceiling Drying Work?
Many homeowners attempt DIY ceiling drying by opening windows, using fans, or applying household dehumidifiers. While this can work for minor leaks, it is often insufficient for larger water damage events. Common challenges include:
-
Hidden Moisture: Water can seep behind walls and into insulation, which is difficult to detect without professional tools.
-
Mold Risk: Improper drying increases the likelihood of mold and mildew growth, which can affect indoor air quality and health.
-
Structural Damage: Water can weaken the ceiling structure. Without proper drying techniques, you risk long-term damage that is expensive to repair.
For these reasons, calling a professional service like Structural Drying Australia is often the safest and most effective solution.
Why Wet Wall Drying is as Important as Ceiling Drying
Ceiling drying alone may not solve all water damage problems. Water often travels along walls, saturating drywall and insulation. Wet wall drying ensures that all affected areas are properly dried, preventing hidden moisture issues. Some key benefits of wet wall drying include:
-
Prevents Mold and Mildew: Moist walls are prime breeding grounds for mold. Proper drying removes this risk.
-
Protects Structural Integrity: Prolonged wetness weakens both walls and ceilings. Wet wall drying ensures the entire structure remains strong.
-
Improves Indoor Air Quality: Dry walls reduce the growth of mold spores and bacteria, which can negatively impact air quality.
-
Speeds Up Overall Drying: Addressing walls and ceilings together accelerates the entire drying process, minimizing downtime for homeowners.
Professional services combine ceiling drying and wet wall drying to achieve the best results.
How to Speed Up the Ceiling Drying Process
While professional intervention is ideal, you can support the process with some practical steps:
-
Increase Ventilation: Open windows and doors to improve airflow.
-
Use Fans and Dehumidifiers: Place fans strategically to circulate air, and use dehumidifiers to remove moisture from the air.
-
Remove Wet Materials: Take down wet ceiling tiles or drywall if possible, to allow faster drying.
-
Monitor Moisture Levels: Regularly check for hidden damp spots to prevent mold growth.
These steps complement professional techniques, reducing ceiling drying time while protecting your home.
Signs That Your Ceiling is Fully Dry
Knowing when your ceiling is completely dry is crucial before repairs or repainting. Signs include:
-
No visible damp spots or discoloration.
-
Absence of a musty smell.
-
Walls and ceilings feel dry to the touch.
-
Moisture meters indicate acceptable levels.
Even after the surface seems dry, hidden moisture could persist. Professional assessment ensures that your ceiling is genuinely ready for restoration.
Conclusion: Why Timely and Proper Ceiling Drying Matters
Water damage can escalate quickly, turning a small leak into a major structural problem. Proper ceiling drying and wet wall drying are essential steps in protecting your home. Timely intervention prevents mold growth, preserves structural integrity, and ensures a healthier living environment.
By understanding the factors affecting drying time, employing professional techniques, and monitoring progress carefully, homeowners can ensure their ceilings and walls dry completely and safely. For homeowners in Australia, trusted services like Structural Drying Australia offer expert solutions that combine efficiency and reliability. Whether it’s minor water damage or significant flooding, professional ceiling drying and wet wall drying services are the key to restoring your home safely and effectively.